Oct 21, 2026Buying Guides
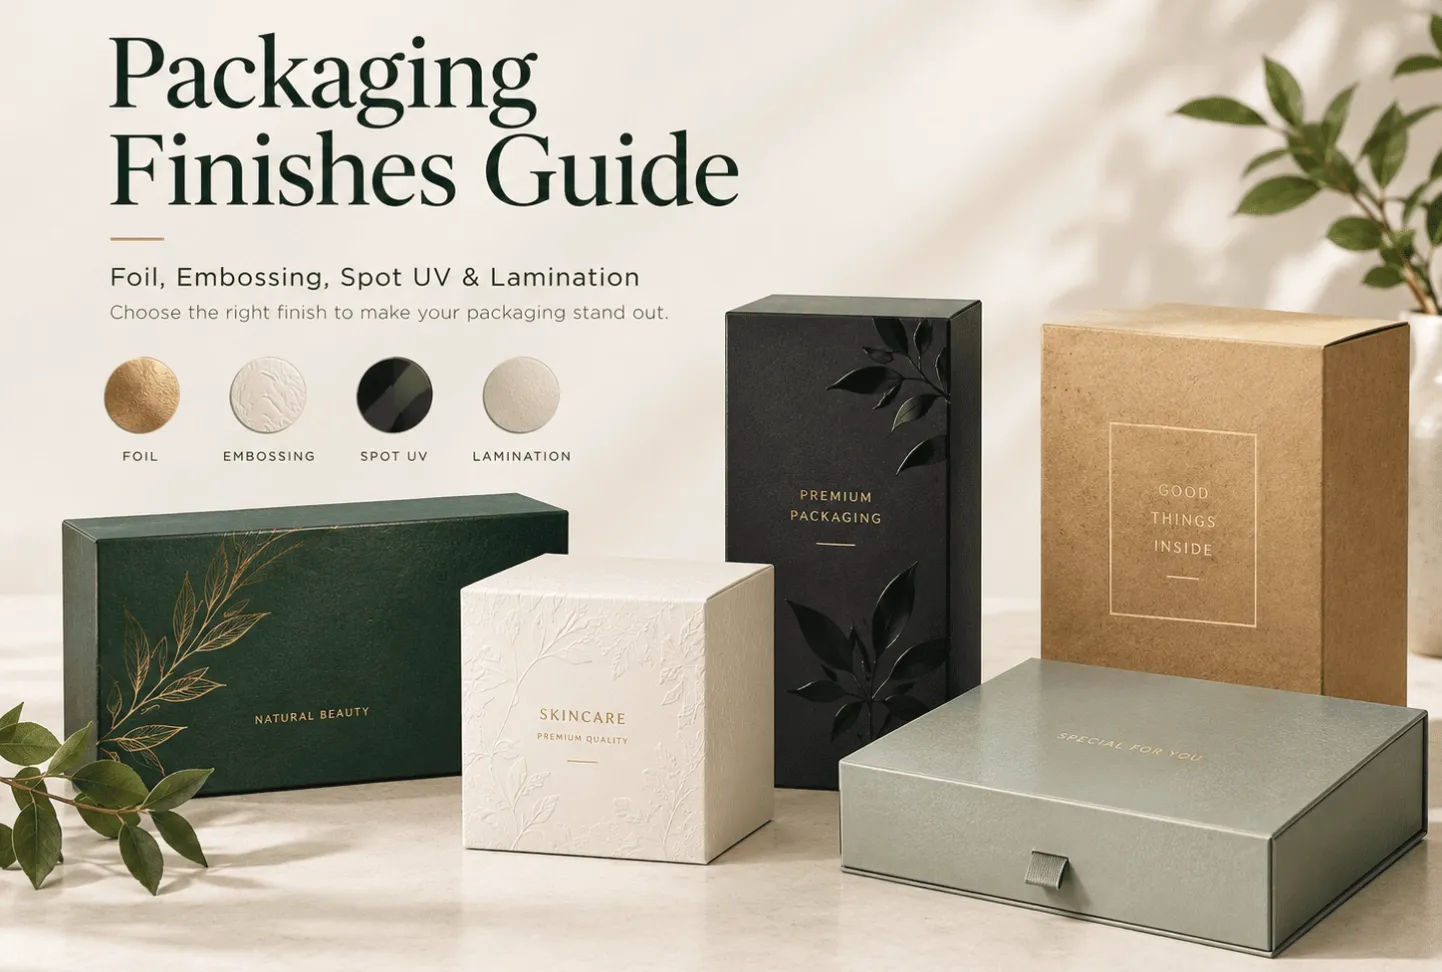
Packaging Finishes Guide: Foil, Embossing, Spot UV & Lamination
Compare foil stamping, embossing, debossing, spot UV, raised spot UV, and lamination. Learn how to choose packaging finishes for your design, material, and budget.
PackaPackaging Finishes: A Complete Guide to Foil,
Embossing, Spot UV & Lamination
Printing puts your design on the box. Packaging finishes bring it to life through shine, texture,
contrast, and touch.
Your custom box artwork can look clean on screen, but finishes are what shape the unboxing
experience - the moment your customer sees, touches, and remembers your brand. From metallic
foil stamping to raised embossed logos, glossy spot UV accents, and smooth matte or soft-touch
lamination, thoughtful finishing choices turn ordinary packaging into a distinctive brand asset.
That said, every finishing process comes with unique production limits, lead time considerations,
and cost tradeoffs. Stacking every special effect does not automatically create better packaging.
The smart approach is to pick finishes that complement your brand aesthetic, work with your
packaging substrate, and fit your budget.
In this guide, we break down the most widely used packaging finishes, compare their visual,
tactile and cost profiles, and walk you through how to build balanced, production-ready finish
combinations for your custom packaging boxes.
What Are Packaging Finishes?
Packaging finishes are surface treatments applied to printed paper or board to alter appearance,
texture, durability, and protective performance. Depending on the technique, a finish may be
applied before printing, inline during production, or as a post-print finishing step.
The most common packaging finishing options we cover here include:
Foil stamping: Adds metallic or colored foil accents for a reflective, premium appearance.
Embossing: Raises selected surface areas to create a tactile, raised relief effect.
Debossing: Presses selected areas inward to create a subtle recessed impression.
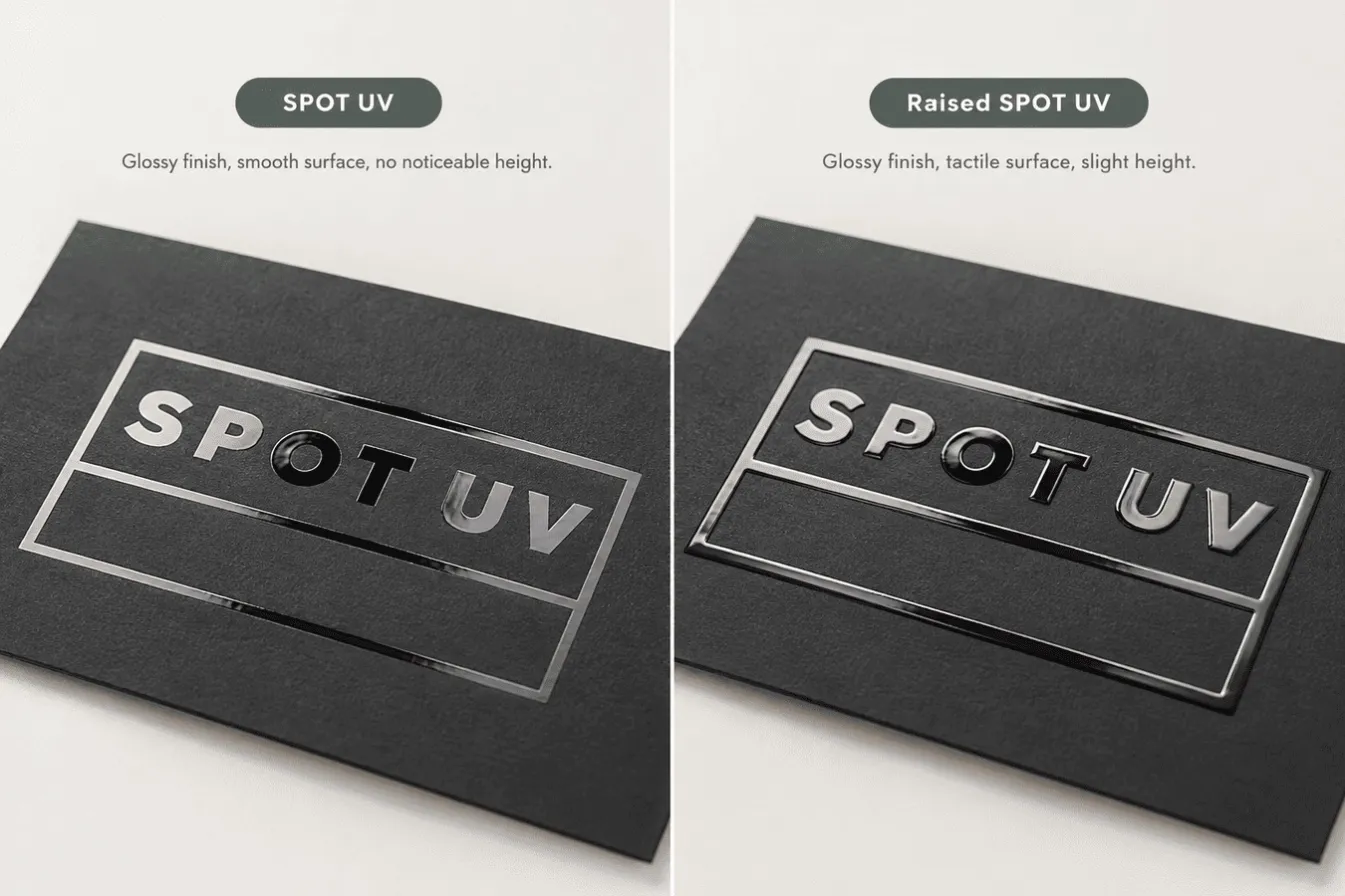
Spot UV: Applies a clear glossy coating only to targeted design areas for contrast and
emphasis.
Raised spot UV: Deposits a thicker UV varnish for a glossy, slightly raised textured highlight.
Lamination: Bonds a thin protective film across the printed surface to change sheen and boost
scratch resistance.
Each technique delivers a different outcome. Some prioritize eye-catching visual contrast, while
others focus on soft tactile feel or long-term surface protection.
For brand owners sourcing custom packaging boxes, the biggest mistake is paying for finishes
you do not understand. Start by learning what each effect delivers before deciding which
upgrades are worth the extra investment.
1. Foil Stamping: Add Metallic Shine to Your Packaging
Foil stamping (hot foil stamping) uses heat, pressure, and a custom metal die to transfer a thin
pigmented or metallic foil layer onto targeted zones of your packaging. Gold and silver areperennial favorites, but copper, rose gold, matte metallic, solid color, and holographic foil options
are also available.
Image suggestion: Close-up macro shot of polished gold foil logo on a forest-green rigid gift box, soft
natural lighting.
What Does Foil Stamping Look Like?
Foil creates a distinct reflective, opaque finish that makes logos, brand names, borders or graphic
flourishes pop against surrounding printed surfaces.
Common foil options:
Gold foil: The classic choice for luxury, high-end gift, beauty and premium retail packaging.
Silver foil: Sleek, neutral, and contemporary, perfect for minimalist and tech-forward brands.
Holographic foil: Dynamic, light-shifting effect ideal for limited-edition releases or youth-
focused products.
Colored foil: Solid non-metallic pigment foils to match brand accent colors without metallic
reflection.
When Should You Use Foil Stamping?
Foil stamping shines on rigid gift boxes, cosmetic compacts and serum boxes, fragrance
packaging, premium retail cartons, and branded presentation boxes.
It delivers the strongest ROI when used selectively on:
Brand logos and wordmarks
Product names, collection titles, or edition markings
Thin dividing lines, borders, and delicate decorative patterns
Key focal elements on box lids
How Much Does Foil Stamping Cost?
Pricing depends on foil coverage area, foil grade, custom die/tooling fees, artwork intricacy, and
total order quantity. A small, simple foil logo will be far more economical than a full-panel foil
flood. Always confirm final pricing with your packaging supplier, as production tolerances and
setup workflows vary widely by design.
Practical tip: Use foil to highlight just one or two core design elements instead of covering
large surfaces. Selective foil stamping creates a luxury feel while keeping production simpler
and costs under control. Avoid running foil across heavy crease lines where cracking and
peeling risk is high.
2. Embossing and Debossing: Create Tactile Packaging
Embossing and debossing physically reshape the paperboard surface with pressure and custom
dies, adding touchable dimension without ink or foil (known as blind emboss / blind deboss) or
paired with other print finishes.
Image suggestion: Side-by-side close-up of blind embossed raised logo and blind debossed recessed logo
on thick textured cream premium paper.What Is Embossing?
Embossing pushes the design upward from the base surface, forming a raised relief you can both
see and feel. It is widely used for logos, monograms, ornamental patterns, brand names, and
standout graphic elements. Multi-level sculpted embossing is available for more dramatic 3D
depth, though it raises cost and production complexity.
What Is Debossing?
Debossing presses the design inward, leaving a clean sunken impression in the board. Compared
with embossing, debossing often reads as quieter and more restrained, making it a strong fit for
minimalist, understated brand identities.
Which Materials Work Best?
Embossing and debossing work best on thick, stable paperboard, specialty cover papers, and
compatible rigid box wrapping stocks. The final quality hinges on board caliper, surface coating,
paper grain direction, box structure, and the detail level of your artwork.
Ultra-fine hairlines, extremely deep impressions, or poorly matched substrate combinations often
result in fuzzy edges, creasing, or surface splitting. Your supplier should review your artwork and
material selection upfront to confirm the effect is achievable before you lock in dielines.
Can You Combine Embossing with Foil Stamping?
Absolutely. Registered foil + embossing aligns a metallic foil layer on top of a raised emboss,
combining mirror-like shine with satisfying tactile depth.
That said, artwork, die tooling, paper stock, and production sequence must all be compatible. A
physical press sample is the most reliable way to judge registration, edge crispness, and finish
durability.
Practical tip: Keep embossed and debossed shapes bold and generously sized. Simple logos
and thick outlines produce far more consistent results than tiny, intricate fine-line artwork.
3. Spot UV and Raised Spot UV: Highlight Selected Details
Spot UV applies a clear, glossy UV-cured varnish only to selected design areas, rather than
coating the entire box. It is most impactful over a matte laminated base, where the gloss/matte
contrast shifts and catches light as the box moves.
Image suggestion: Glossy spot UV botanical pattern over a matte cream folding carton, soft side lighting
emphasizing contrast.
What Is Standard Spot UV?
Standard spot UV lays down a smooth, flat glossy clear coat over targeted print areas.
Common applications:
Brand logos and wordmarks
Decorative illustrations and patterns
Product names and callout text
Graphic features you want to visually separate from the rest of the designFor example: a matte-laminated box with a subtle glossy logo stays calm and neutral head-on,
then reveals the logo dynamically as light hits it from different angles.
What Is Raised Spot UV?
Raised spot UV uses multiple stacked layers of UV varnish to build gentle height, adding a tactile
bump alongside the glossy sheen. It is popular for premium retail packaging, cosmetic boxes,
promotional limited runs, and presentation kits where you want select details to stand out visually
and physically.
Spot UV vs. Raised Spot UV
Feature Standard Spot UV Raised Spot UV
Surface Smooth, flat glossy Glossy + slightly raised texture
Visual effect Light contrast and shine Contrast, shine, and subtle tactile
relief
Typical use Logo highlights, graphic accents Statement logos, prominent
decorative artwork
Cost considerations Based on coverage area +
screen/plate setup
Extra material and repeated
curing cycles add cost
Key production check Artwork separation and precise
registration
Varnish height, minimum detail
size, substrate compatibility
Neither option is universally better. Your choice comes down to the look and feel you want, your
artwork, your base paper stock, and your production budget.
What Should You Check Before Production?
Spot UV and raised spot UV require separate spot-color artwork layers, supplied to your printer's
specifications. The UV area must register perfectly with the underlying printed design. Tiny gaps,
ultra-thin strokes, and overly intricate filigree patterns often need simplification to avoid messy
bleed or blurred edges.
Practical tip: For budget-friendly premium styling, matte lamination + spot UV on your logo
is a proven combo. It creates luxury contrast without layering multiple high-cost finishing
processes.
4. Lamination: Choose the Right Base Surface Finish
Lamination bonds a thin plastic film over your entire printed surface. It defines the base look and
feel of your box while adding scratch, scuff, and moisture resistance. The three most common
options are matte, gloss, and soft-touch lamination.
Image suggestion: Three side-by-side cream packaging swatches showing matte, gloss, and soft-touch
lamination for direct surface comparison.
Matte Lamination
Matte lamination delivers low-gloss, muted, understated surface with minimal reflection. It is the
foundation for modern, minimalist premium packaging, pairing beautifully with dark forest green,
black, warm cream, and muted earth-tone brand palettes.Important caveat: Not all matte films resist fingerprints equally well. "Matte" does not
automatically mean fingerprint-proof. Ask your supplier for film specs or samples if hand contact
will be frequent.
Gloss Lamination
Gloss lamination creates a bright, reflective surface that makes printed colors appear saturated
and vivid. It is ideal for vibrant retail packaging, promotional seasonal boxes, and designs that
need to pop on crowded store shelves. Protective performance varies heavily by film grade.
Soft-Touch Lamination
Soft-touch lamination yields an ultra-smooth, velvety, rubbery handfeel - one of the most
recognizable luxury packaging finishes. It is widely used for high-end cosmetics, fragrance boxes,
luxury gift sets, and investor presentation packaging.
While it feels sophisticated out of the box, soft-touch films differ greatly in scratch and scuff
resistance. If your boxes will be handled repeatedly, shipped, or stacked, always test a physical
sample before committing.
Lamination Selection Table
Lamination Type Appearance Common Applications Key Consideration
Matte Low-gloss, subdued Minimalist, modern
premium packaging
Fingerprint and scuff
resistance vary by film
Gloss Highly reflective, color-
boosting
Colorful retail,
promotional packaging
Surface durability and
glare depend on film
selection
Soft-touch Velvety, smooth tactile
feel
Luxury gift, beauty,
presentation boxes
Verify scratch resistance
for high-handling use
cases
Practical tip: Pick lamination first based on your brand's core aesthetic and real-world
handling conditions. If durability matters more than aesthetics, test physical samples rather
than relying solely on finish names.
5. Packaging Finishes Comparison: Which Option Is Right for
You?
Each finish solves a different design goal. This table is a buyer-focused quick reference for
comparing finishing options for custom packaging:
Finish Main Effect Common Applications Cost Considerations
Foil stamping Metallic reflective shine Logos, premium graphic
accents
Foil coverage, die
tooling, setup fees,
order quantity
Embossing Raised tactile texture Logos, decorative
patterns
Custom die cost, paper
stability, artwork
complexityFinish Main Effect Common Applications Cost Considerations
Debossing Recessed, subtle texture Quiet minimalist
branding
Die cost, material
thickness, impression
depth
Spot UV Selective targeted gloss Logo highlights, graphic
callouts
Coated area, artwork
separation, screen setup
Raised spot UV Raised glossy texture Statement premium
highlights
Multiple varnish passes,
curing and registration
limits
Matte lamination Low-gloss uniform
surface
Modern minimalist
packaging
Film grade, surface
treatment, anti-
fingerprint performance
Gloss lamination Bright reflective surface Vibrant retail packaging
Film thickness, UV
stability, scratch
resistance
Soft-touch lamination Velvety smooth
handfeel
Luxury gift and beauty
packaging
Premium film pricing,
scuff and fingerprint
performance
This is a general overview, not a fixed price ranking. Final pricing shifts dramatically with box
structure, board grade, run quantity, finish coverage, and your supplier's workflow.
When reviewing quotations, explicitly confirm which finishing steps are included in the unit price,
and whether tooling, dies, screens or setup charges are billed separately.
6. How to Combine Packaging Finishes Without Overspending
The most memorable packaging designs usually rely on one primary base finish plus one or two
carefully chosen accent effects. Piling on every available finish inflates cost, complicates
registration and production sequencing, and can create visual clutter that dilutes your brand
identity.
Here are three balanced, widely effective finish combinations to consider:
Option 1: Luxury Packaging
Soft-touch lamination + foil stamping + embossing
This stack delivers a velvety base surface, metallic highlights, and satisfying raised logo texture.
It works beautifully for fragrance, high-end skincare, and luxury gift boxes.
Note: Multiple sequential processes raise production risk, registration tolerance requirements, and
total cost. Always validate with a physical sample.
Option 2: Clean and Modern Packaging
Matte lamination + spot UV
A calm matte foundation lets selective glossy UV details create quiet, dynamic contrast. This is a
versatile, cost-effective choice for skincare packaging, contemporary DTC retail brands, and
minimalist brand identities.Option 3: Restrained Premium Packaging
Matte lamination + selective foil stamping
Use lamination as your base, and reserve foil only for your logo or one key graphic element. It
achieves refined luxury without the complexity of multi-process finishing.
What Should You Avoid When Combining Finishes?
Before locking in mixed finishing specs, work through these checks:
Do not add a finish unless it actively improves the unboxing experience or reinforces your
brand.
Verify compatibility between finishes and your chosen paper/board stock. Some finishes
repel or react with one another.
Confirm the correct production sequence with your supplier. Order of operations directly
impacts quality.
Map finishes against crease lines, folds, glue flaps and box edges. Foil and UV across folds
often crack.
Evaluate whether one-off tooling charges make sense for smaller order volumes.
When combining multiple finishes, a physical pre-production sample is non-negotiable. It lets
you inspect surface quality, alignment, tactile depth, and fold behavior before mass production.
Real-World Example: Avoiding Foil Failure on Fold Lines
On one custom packaging project, the customer wanted interior gold foil, but our team flagged a
high risk of foil cracking and flaking along folded creases. Foil's durability depends heavily on
substrate flexibility and placement relative to score lines.
We presented an alternative: gold pigment printing paired with spot UV. This delivers a warm
gold aesthetic while eliminating the cracking risk on folding areas.
There is no universal "best" solution. The right finish depends on your artwork, paper, box
structure, and desired look. Samples are especially critical whenever a finish crosses a crease or
sits near folded edges.
Key takeaway: Premium finishes should work with your box structure, not against it. Before
approving specs, evaluate both visual appeal and how the box will fold, assemble, ship, and
be handled by customers.
7. How to Choose the Right Finish for Your Custom Packaging
Box
Your perfect finish selection starts with your product, brand personality, material constraints, and
budget. Run through this checklist before finalizing packaging specifications:
1. Start with your brand identity
Decide the feeling you want to communicate: luxurious, minimalist, playful, bold, or understated.
Luxury brands: Foil, embossing, soft-touch lamination are strong candidates. Minimalist brands: Matte lamination paired with selective spot UV.
Bright retail brands: Gloss lamination with targeted foil or UV highlights.
These are guidelines, not rigid rules. Your artwork and target audience always take priority.
2. Pick your primary visual or tactile effect first
Identify the single most important outcome. If your logo needs to grab attention, foil or spot UV
may be enough. If a memorable touch experience is your priority, embossing, debossing or soft-
touch lamination may be the better fit. Avoid paying for competing effects that do not serve your
core goal.
3. Account for your packaging material
Not every finish works reliably on every substrate. Paper grain, surface coating, board thickness,
and folding geometry all change results. Confirm material-finish compatibility with your supplier
before finalizing files.
4. Review your artwork and dieline together
Finishing layers must align with your print file and structural dieline. Foil and spot UV need
separate spot-color separations; emboss/deboss requires dedicated die artwork. Your supplier will
specify file formats, spot-color naming, registration tolerances, and bleed rules.
For more guidance, read our article: https://cherubox.com/posts/packaging-dieline-checklist-
before-production/
5. Request a physical sample
Digital mockups are great for layout review, but they cannot replicate metallic reflection, tactile
depth, surface slip, fingerprinting, or fold performance. Always sample when finishes are central
to your brand experience or when combining multiple processes.
6. Evaluate total packaging cost, not just finish cost
Do not judge finishing upgrades in isolation. Price out the full package: box structure, board stock,
printing, finishes, inserts, and packing requirements.
If you want to cut cost while preserving quality, explore our cost-reduction guide:
https://cherubox.com/posts/reduce-custom-packaging-costs/
For broader budgeting guidance: https://cherubox.com/posts/how-much-do-custom-packaging-
boxes-cost/
Frequently Asked Questions About Packaging Finishes
What are the most common packaging finishes?
The most widely used custom packaging finishes are foil stamping, embossing, debossing, spot
UV, raised spot UV, plus matte, gloss and soft-touch lamination. Each modifies surface
appearance, texture, or protective properties in distinct ways.
Which packaging finish looks the most premium?There is no single "most premium" finish for every brand. Foil delivers metallic shine, embossing
adds tactile depth, and soft-touch lamination creates a luxe velvety surface. Usually the most
balanced high-end look comes from a solid base lamination plus one carefully chosen accent
finish, rather than stacking every effect.
Does foil stamping increase packaging costs?
Yes. Foil stamping adds a dedicated production pass. Cost is driven by coverage area, foil type,
custom die setup, artwork complexity, and order size. Always lock in final pricing with your
supplier before approving specs.
Can foil stamping and embossing be combined?
Yes. Registered foil + embossing pairs metallic foil with a raised relief effect. Material, die
design, artwork, and production sequence all need to be compatible. A physical sample is the best
way to confirm quality and alignment.
Is spot UV expensive?
Spot UV pricing depends on coverage area, artwork complexity, screen setup, and quantity. A
simple logo highlight can be a budget-friendly premium upgrade, while raised spot UV or dense,
intricate patterns carry extra processing expense.
What is the difference between matte and soft-touch lamination?
Matte lamination creates a low-reflection, non-glossy surface. Soft-touch lamination has a special
additive that creates a velvety, rubbery handfeel. Both are used for premium packaging, but they
differ dramatically in touch, fingerprint resistance, and scratch performance by film grade.
Do packaging finishes increase production time?
They often do. Each extra finishing step adds setup, run time, and quality inspection. If your
design includes foil, emboss, spot UV or specialty lamination, confirm lead time upfront before
locking in your launch timeline.
Should I request a sample before mass production?
Absolutely - especially when you use specialty finishes or combine multiple finishing techniques.
A physical sample lets you assess true surface texture, light behavior, registration accuracy,
fingerprint susceptibility, and folding performance before approving full production.
Looking for Packaging Finishing Guidance?
Choosing packaging finishes is about far more than aesthetics. The right combination must
reinforce your brand identity, work harmoniously with your box structure, and fit within your
budget.
Cherubox supports DTC brands, product creators, and wholesale buyers with end-to-end custom
paper packaging solutions, including box structure development, material selection, printing, and
finishing options such as foil stamping, embossing, spot UV, and lamination.
Share your artwork, preferred box style, order quantity, and target finishing effects. Our team can
walk through compatible options and flag production risks before you send files to press.Request a quote: https://www.cherubox.com/contact-us
Email: sales@cherubox.comging Finishes: A Complete Guide to Foil,
Embossing, Spot UV & Lamination
Printing puts your design on the box. Packaging finishes bring it to life through shine, texture,
contrast, and touch.
Your custom box artwork can look clean on screen, but finishes are what shape the unboxing
experience - the moment your customer sees, touches, and remembers your brand. From metallic
foil stamping to raised embossed logos, glossy spot UV accents, and smooth matte or soft-touch
lamination, thoughtful finishing choices turn ordinary packaging into a distinctive brand asset.
That said, every finishing process comes with unique production limits, lead time considerations,
and cost tradeoffs. Stacking every special effect does not automatically create better packaging.
The smart approach is to pick finishes that complement your brand aesthetic, work with your
packaging substrate, and fit your budget.
In this guide, we break down the most widely used packaging finishes, compare their visual,
tactile and cost profiles, and walk you through how to build balanced, production-ready finish
combinations for your custom packaging boxes.
What Are Packaging Finishes?
Packaging finishes are surface treatments applied to printed paper or board to alter appearance,
texture, durability, and protective performance. Depending on the technique, a finish may be
applied before printing, inline during production, or as a post-print finishing step.
The most common packaging finishing options we cover here include:
Foil stamping: Adds metallic or colored foil accents for a reflective, premium appearance.
Embossing: Raises selected surface areas to create a tactile, raised relief effect.
Debossing: Presses selected areas inward to create a subtle recessed impression.
Spot UV: Applies a clear glossy coating only to targeted design areas for contrast and
emphasis.
Raised spot UV: Deposits a thicker UV varnish for a glossy, slightly raised textured highlight.
Lamination: Bonds a thin protective film across the printed surface to change sheen and boost
scratch resistance.
Each technique delivers a different outcome. Some prioritize eye-catching visual contrast, while
others focus on soft tactile feel or long-term surface protection.
For brand owners sourcing custom packaging boxes, the biggest mistake is paying for finishes
you do not understand. Start by learning what each effect delivers before deciding which
upgrades are worth the extra investment.
1. Foil Stamping: Add Metallic Shine to Your Packaging
Foil stamping (hot foil stamping) uses heat, pressure, and a custom metal die to transfer a thin
pigmented or metallic foil layer onto targeted zones of your packaging. Gold and silver areperennial favorites, but copper, rose gold, matte metallic, solid color, and holographic foil options
are also available.
Image suggestion: Close-up macro shot of polished gold foil logo on a forest-green rigid gift box, soft
natural lighting.
What Does Foil Stamping Look Like?
Foil creates a distinct reflective, opaque finish that makes logos, brand names, borders or graphic
flourishes pop against surrounding printed surfaces.
Common foil options:
Gold foil: The classic choice for luxury, high-end gift, beauty and premium retail packaging.
Silver foil: Sleek, neutral, and contemporary, perfect for minimalist and tech-forward brands.
Holographic foil: Dynamic, light-shifting effect ideal for limited-edition releases or youth-
focused products.
Colored foil: Solid non-metallic pigment foils to match brand accent colors without metallic
reflection.
When Should You Use Foil Stamping?
Foil stamping shines on rigid gift boxes, cosmetic compacts and serum boxes, fragrance
packaging, premium retail cartons, and branded presentation boxes.
It delivers the strongest ROI when used selectively on:
Brand logos and wordmarks
Product names, collection titles, or edition markings
Thin dividing lines, borders, and delicate decorative patterns
Key focal elements on box lids
How Much Does Foil Stamping Cost?
Pricing depends on foil coverage area, foil grade, custom die/tooling fees, artwork intricacy, and
total order quantity. A small, simple foil logo will be far more economical than a full-panel foil
flood. Always confirm final pricing with your packaging supplier, as production tolerances and
setup workflows vary widely by design.
Practical tip: Use foil to highlight just one or two core design elements instead of covering
large surfaces. Selective foil stamping creates a luxury feel while keeping production simpler
and costs under control. Avoid running foil across heavy crease lines where cracking and
peeling risk is high.
2. Embossing and Debossing: Create Tactile Packaging
Embossing and debossing physically reshape the paperboard surface with pressure and custom
dies, adding touchable dimension without ink or foil (known as blind emboss / blind deboss) or
paired with other print finishes.
Image suggestion: Side-by-side close-up of blind embossed raised logo and blind debossed recessed logo
on thick textured cream premium paper.What Is Embossing?
Embossing pushes the design upward from the base surface, forming a raised relief you can both
see and feel. It is widely used for logos, monograms, ornamental patterns, brand names, and
standout graphic elements. Multi-level sculpted embossing is available for more dramatic 3D
depth, though it raises cost and production complexity.
What Is Debossing?
Debossing presses the design inward, leaving a clean sunken impression in the board. Compared
with embossing, debossing often reads as quieter and more restrained, making it a strong fit for
minimalist, understated brand identities.
Which Materials Work Best?
Embossing and debossing work best on thick, stable paperboard, specialty cover papers, and
compatible rigid box wrapping stocks. The final quality hinges on board caliper, surface coating,
paper grain direction, box structure, and the detail level of your artwork.
Ultra-fine hairlines, extremely deep impressions, or poorly matched substrate combinations often
result in fuzzy edges, creasing, or surface splitting. Your supplier should review your artwork and
material selection upfront to confirm the effect is achievable before you lock in dielines.
Can You Combine Embossing with Foil Stamping?
Absolutely. Registered foil + embossing aligns a metallic foil layer on top of a raised emboss,
combining mirror-like shine with satisfying tactile depth.
That said, artwork, die tooling, paper stock, and production sequence must all be compatible. A
physical press sample is the most reliable way to judge registration, edge crispness, and finish
durability.
Practical tip: Keep embossed and debossed shapes bold and generously sized. Simple logos
and thick outlines produce far more consistent results than tiny, intricate fine-line artwork.
3. Spot UV and Raised Spot UV: Highlight Selected Details
Spot UV applies a clear, glossy UV-cured varnish only to selected design areas, rather than
coating the entire box. It is most impactful over a matte laminated base, where the gloss/matte
contrast shifts and catches light as the box moves.
Image suggestion: Glossy spot UV botanical pattern over a matte cream folding carton, soft side lighting
emphasizing contrast.
What Is Standard Spot UV?
Standard spot UV lays down a smooth, flat glossy clear coat over targeted print areas.
Common applications:
Brand logos and wordmarks
Decorative illustrations and patterns
Product names and callout text
Graphic features you want to visually separate from the rest of the designFor example: a matte-laminated box with a subtle glossy logo stays calm and neutral head-on,
then reveals the logo dynamically as light hits it from different angles.
What Is Raised Spot UV?
Raised spot UV uses multiple stacked layers of UV varnish to build gentle height, adding a tactile
bump alongside the glossy sheen. It is popular for premium retail packaging, cosmetic boxes,
promotional limited runs, and presentation kits where you want select details to stand out visually
and physically.
Spot UV vs. Raised Spot UV
Feature Standard Spot UV Raised Spot UV
Surface Smooth, flat glossy Glossy + slightly raised texture
Visual effect Light contrast and shine Contrast, shine, and subtle tactile
relief
Typical use Logo highlights, graphic accents Statement logos, prominent
decorative artwork
Cost considerations Based on coverage area +
screen/plate setup
Extra material and repeated
curing cycles add cost
Key production check Artwork separation and precise
registration
Varnish height, minimum detail
size, substrate compatibility
Neither option is universally better. Your choice comes down to the look and feel you want, your
artwork, your base paper stock, and your production budget.
What Should You Check Before Production?
Spot UV and raised spot UV require separate spot-color artwork layers, supplied to your printer's
specifications. The UV area must register perfectly with the underlying printed design. Tiny gaps,
ultra-thin strokes, and overly intricate filigree patterns often need simplification to avoid messy
bleed or blurred edges.
Practical tip: For budget-friendly premium styling, matte lamination + spot UV on your logo
is a proven combo. It creates luxury contrast without layering multiple high-cost finishing
processes.
4. Lamination: Choose the Right Base Surface Finish
Lamination bonds a thin plastic film over your entire printed surface. It defines the base look and
feel of your box while adding scratch, scuff, and moisture resistance. The three most common
options are matte, gloss, and soft-touch lamination.
Image suggestion: Three side-by-side cream packaging swatches showing matte, gloss, and soft-touch
lamination for direct surface comparison.
Matte Lamination
Matte lamination delivers low-gloss, muted, understated surface with minimal reflection. It is the
foundation for modern, minimalist premium packaging, pairing beautifully with dark forest green,
black, warm cream, and muted earth-tone brand palettes.Important caveat: Not all matte films resist fingerprints equally well. "Matte" does not
automatically mean fingerprint-proof. Ask your supplier for film specs or samples if hand contact
will be frequent.
Gloss Lamination
Gloss lamination creates a bright, reflective surface that makes printed colors appear saturated
and vivid. It is ideal for vibrant retail packaging, promotional seasonal boxes, and designs that
need to pop on crowded store shelves. Protective performance varies heavily by film grade.
Soft-Touch Lamination
Soft-touch lamination yields an ultra-smooth, velvety, rubbery handfeel - one of the most
recognizable luxury packaging finishes. It is widely used for high-end cosmetics, fragrance boxes,
luxury gift sets, and investor presentation packaging.
While it feels sophisticated out of the box, soft-touch films differ greatly in scratch and scuff
resistance. If your boxes will be handled repeatedly, shipped, or stacked, always test a physical
sample before committing.
Lamination Selection Table
Lamination Type Appearance Common Applications Key Consideration
Matte Low-gloss, subdued Minimalist, modern
premium packaging
Fingerprint and scuff
resistance vary by film
Gloss Highly reflective, color-
boosting
Colorful retail,
promotional packaging
Surface durability and
glare depend on film
selection
Soft-touch Velvety, smooth tactile
feel
Luxury gift, beauty,
presentation boxes
Verify scratch resistance
for high-handling use
cases
Practical tip: Pick lamination first based on your brand's core aesthetic and real-world
handling conditions. If durability matters more than aesthetics, test physical samples rather
than relying solely on finish names.
5. Packaging Finishes Comparison: Which Option Is Right for
You?
Each finish solves a different design goal. This table is a buyer-focused quick reference for
comparing finishing options for custom packaging:
Finish Main Effect Common Applications Cost Considerations
Foil stamping Metallic reflective shine Logos, premium graphic
accents
Foil coverage, die
tooling, setup fees,
order quantity
Embossing Raised tactile texture Logos, decorative
patterns
Custom die cost, paper
stability, artwork
complexityFinish Main Effect Common Applications Cost Considerations
Debossing Recessed, subtle texture Quiet minimalist
branding
Die cost, material
thickness, impression
depth
Spot UV Selective targeted gloss Logo highlights, graphic
callouts
Coated area, artwork
separation, screen setup
Raised spot UV Raised glossy texture Statement premium
highlights
Multiple varnish passes,
curing and registration
limits
Matte lamination Low-gloss uniform
surface
Modern minimalist
packaging
Film grade, surface
treatment, anti-
fingerprint performance
Gloss lamination Bright reflective surface Vibrant retail packaging
Film thickness, UV
stability, scratch
resistance
Soft-touch lamination Velvety smooth
handfeel
Luxury gift and beauty
packaging
Premium film pricing,
scuff and fingerprint
performance
This is a general overview, not a fixed price ranking. Final pricing shifts dramatically with box
structure, board grade, run quantity, finish coverage, and your supplier's workflow.
When reviewing quotations, explicitly confirm which finishing steps are included in the unit price,
and whether tooling, dies, screens or setup charges are billed separately.
6. How to Combine Packaging Finishes Without Overspending
The most memorable packaging designs usually rely on one primary base finish plus one or two
carefully chosen accent effects. Piling on every available finish inflates cost, complicates
registration and production sequencing, and can create visual clutter that dilutes your brand
identity.
Here are three balanced, widely effective finish combinations to consider:
Option 1: Luxury Packaging
Soft-touch lamination + foil stamping + embossing
This stack delivers a velvety base surface, metallic highlights, and satisfying raised logo texture.
It works beautifully for fragrance, high-end skincare, and luxury gift boxes.
Note: Multiple sequential processes raise production risk, registration tolerance requirements, and
total cost. Always validate with a physical sample.
Option 2: Clean and Modern Packaging
Matte lamination + spot UV
A calm matte foundation lets selective glossy UV details create quiet, dynamic contrast. This is a
versatile, cost-effective choice for skincare packaging, contemporary DTC retail brands, and
minimalist brand identities.Option 3: Restrained Premium Packaging
Matte lamination + selective foil stamping
Use lamination as your base, and reserve foil only for your logo or one key graphic element. It
achieves refined luxury without the complexity of multi-process finishing.
What Should You Avoid When Combining Finishes?
Before locking in mixed finishing specs, work through these checks:
Do not add a finish unless it actively improves the unboxing experience or reinforces your
brand.
Verify compatibility between finishes and your chosen paper/board stock. Some finishes
repel or react with one another.
Confirm the correct production sequence with your supplier. Order of operations directly
impacts quality.
Map finishes against crease lines, folds, glue flaps and box edges. Foil and UV across folds
often crack.
Evaluate whether one-off tooling charges make sense for smaller order volumes.
When combining multiple finishes, a physical pre-production sample is non-negotiable. It lets
you inspect surface quality, alignment, tactile depth, and fold behavior before mass production.
Real-World Example: Avoiding Foil Failure on Fold Lines
On one custom packaging project, the customer wanted interior gold foil, but our team flagged a
high risk of foil cracking and flaking along folded creases. Foil's durability depends heavily on
substrate flexibility and placement relative to score lines.
We presented an alternative: gold pigment printing paired with spot UV. This delivers a warm
gold aesthetic while eliminating the cracking risk on folding areas.
There is no universal "best" solution. The right finish depends on your artwork, paper, box
structure, and desired look. Samples are especially critical whenever a finish crosses a crease or
sits near folded edges.
Key takeaway: Premium finishes should work with your box structure, not against it. Before
approving specs, evaluate both visual appeal and how the box will fold, assemble, ship, and
be handled by customers.
7. How to Choose the Right Finish for Your Custom Packaging
Box
Your perfect finish selection starts with your product, brand personality, material constraints, and
budget. Run through this checklist before finalizing packaging specifications:
1. Start with your brand identity
Decide the feeling you want to communicate: luxurious, minimalist, playful, bold, or understated.
Luxury brands: Foil, embossing, soft-touch lamination are strong candidates. Minimalist brands: Matte lamination paired with selective spot UV.
Bright retail brands: Gloss lamination with targeted foil or UV highlights.
These are guidelines, not rigid rules. Your artwork and target audience always take priority.
2. Pick your primary visual or tactile effect first
Identify the single most important outcome. If your logo needs to grab attention, foil or spot UV
may be enough. If a memorable touch experience is your priority, embossing, debossing or soft-
touch lamination may be the better fit. Avoid paying for competing effects that do not serve your
core goal.
3. Account for your packaging material
Not every finish works reliably on every substrate. Paper grain, surface coating, board thickness,
and folding geometry all change results. Confirm material-finish compatibility with your supplier
before finalizing files.
4. Review your artwork and dieline together
Finishing layers must align with your print file and structural dieline. Foil and spot UV need
separate spot-color separations; emboss/deboss requires dedicated die artwork. Your supplier will
specify file formats, spot-color naming, registration tolerances, and bleed rules.
For more guidance, read our article: https://cherubox.com/posts/packaging-dieline-checklist-
before-production/
5. Request a physical sample
Digital mockups are great for layout review, but they cannot replicate metallic reflection, tactile
depth, surface slip, fingerprinting, or fold performance. Always sample when finishes are central
to your brand experience or when combining multiple processes.
6. Evaluate total packaging cost, not just finish cost
Do not judge finishing upgrades in isolation. Price out the full package: box structure, board stock,
printing, finishes, inserts, and packing requirements.
If you want to cut cost while preserving quality, explore our cost-reduction guide:
https://cherubox.com/posts/reduce-custom-packaging-costs/
For broader budgeting guidance: https://cherubox.com/posts/how-much-do-custom-packaging-
boxes-cost/
Frequently Asked Questions About Packaging Finishes
What are the most common packaging finishes?
The most widely used custom packaging finishes are foil stamping, embossing, debossing, spot
UV, raised spot UV, plus matte, gloss and soft-touch lamination. Each modifies surface
appearance, texture, or protective properties in distinct ways.
Which packaging finish looks the most premium?There is no single "most premium" finish for every brand. Foil delivers metallic shine, embossing
adds tactile depth, and soft-touch lamination creates a luxe velvety surface. Usually the most
balanced high-end look comes from a solid base lamination plus one carefully chosen accent
finish, rather than stacking every effect.
Does foil stamping increase packaging costs?
Yes. Foil stamping adds a dedicated production pass. Cost is driven by coverage area, foil type,
custom die setup, artwork complexity, and order size. Always lock in final pricing with your
supplier before approving specs.
Packaging Finishes: A Complete Guide to Foil, Embossing, Spot UV & Lamination
Printing puts your design on the box. Packaging finishes bring it to life through shine, texture, contrast, and touch.Your custom box artwork can look clean on screen, but finishes are what shape the unboxing experience — the moment your customer sees, touches, and remembers your brand. From metallic foil stamping to raised embossed logos, glossy spot UV accents, and smooth matte or soft-touch lamination, thoughtful finishing choices turn ordinary packaging into a distinctive brand asset.That said, every finishing process comes with unique production limits, lead time considerations, and cost tradeoffs. Stacking every special effect does not automatically create better packaging. The smart approach is to pick finishes that complement your brand aesthetic, work with your packaging substrate, and fit your budget.In this guide, we break down the most widely used packaging finishes, compare their visual, tactile and cost profiles, and walk you through how to build balanced, production-ready finish combinations for your custom packaging boxes.
What Are Packaging Finishes?
Packaging finishes are surface treatments applied to printed paper or board to alter appearance, texture, durability, and protective performance. Depending on the technique, a finish may be applied before printing, inline during production, or as a post-print finishing step.The most common packaging finishing options we cover here include:
- Foil stamping: Adds metallic or colored foil accents for a reflective, premium appearance.
- Embossing: Raises selected surface areas to create a tactile, raised relief effect.
- Debossing: Presses selected areas inward to create a subtle recessed impression.
- Spot UV: Applies a clear glossy coating only to targeted design areas for contrast and emphasis.
- Raised spot UV: Deposits a thicker UV varnish for a glossy, slightly raised textured highlight.
- Lamination: Bonds a thin protective film across the printed surface to change sheen and boost scratch resistance.
Each technique delivers a different outcome. Some prioritize eye-catching visual contrast, while others focus on soft tactile feel or long-term surface protection.For brand owners sourcing custom packaging boxes, the biggest mistake is paying for finishes you do not understand. Start by learning what each effect delivers before deciding which upgrades are worth the extra investment.
- Foil Stamping: Add Metallic Shine to Your Packaging
Foil stamping (hot foil stamping) uses heat, pressure, and a custom metal die to transfer a thin pigmented or metallic foil layer onto targeted zones of your packaging. Gold and silver are perennial favorites, but copper, rose gold, matte metallic, solid color, and holographic foil options are also available.Image suggestion: Close-up macro shot of polished gold foil logo on a forest-green rigid gift box, soft natural lighting.
What Does Foil Stamping Look Like?
Foil creates a distinct reflective, opaque finish that makes logos, brand names, borders or graphic flourishes pop against surrounding printed surfaces.Common foil options:
- Gold foil: The classic choice for luxury, high-end gift, beauty and premium retail packaging.
- Silver foil: Sleek, neutral, and contemporary, perfect for minimalist and tech-forward brands.
- Holographic foil: Dynamic, light-shifting effect ideal for limited-edition releases or youth-focused products.
- Colored foil: Solid non-metallic pigment foils to match brand accent colors without metallic reflection.
When Should You Use Foil Stamping?
Foil stamping shines on rigid gift boxes, cosmetic compacts and serum boxes, fragrance packaging, premium retail cartons, and branded presentation boxes.It delivers the strongest ROI when used selectively on:
- Brand logos and wordmarks
- Product names, collection titles, or edition markings
- Thin dividing lines, borders, and delicate decorative patterns
- Key focal elements on box lids
How Much Does Foil Stamping Cost?
Pricing depends on foil coverage area, foil grade, custom die/tooling fees, artwork intricacy, and total order quantity. A small, simple foil logo will be far more economical than a full-panel foil flood. Always confirm final pricing with your packaging supplier, as production tolerances and setup workflows vary widely by design.
Practical tip: Use foil to highlight just one or two core design elements instead of covering large surfaces. Selective foil stamping creates a luxury feel while keeping production simpler and costs under control. Avoid running foil across heavy crease lines where cracking and peeling risk is high.
- Embossing and Debossing: Create Tactile Packaging
Embossing and debossing physically reshape the paperboard surface with pressure and custom dies, adding touchable dimension without ink or foil (known as blind emboss / blind deboss) or paired with other print finishes.Image suggestion: Side-by-side close-up of blind embossed raised logo and blind debossed recessed logo on thick textured cream premium paper.
What Is Embossing?
Embossing pushes the design upward from the base surface, forming a raised relief you can both see and feel. It is widely used for logos, monograms, ornamental patterns, brand names, and standout graphic elements. Multi-level sculpted embossing is available for more dramatic 3D depth, though it raises cost and production complexity.
What Is Debossing?
Debossing presses the design inward, leaving a clean sunken impression in the board. Compared with embossing, debossing often reads as quieter and more restrained, making it a strong fit for minimalist, understated brand identities.
Which Materials Work Best?
Embossing and debossing work best on thick, stable paperboard, specialty cover papers, and compatible rigid box wrapping stocks. The final quality hinges on board caliper, surface coating, paper grain direction, box structure, and the detail level of your artwork.Ultra-fine hairlines, extremely deep impressions, or poorly matched substrate combinations often result in fuzzy edges, creasing, or surface splitting. Your supplier should review your artwork and material selection upfront to confirm the effect is achievable before you lock in dielines.
Can You Combine Embossing with Foil Stamping?
Absolutely. Registered foil + embossing aligns a metallic foil layer on top of a raised emboss, combining mirror-like shine with satisfying tactile depth.That said, artwork, die tooling, paper stock, and production sequence must all be compatible. A physical press sample is the most reliable way to judge registration, edge crispness, and finish durability.
Practical tip: Keep embossed and debossed shapes bold and generously sized. Simple logos and thick outlines produce far more consistent results than tiny, intricate fine-line artwork.
- Spot UV and Raised Spot UV: Highlight Selected Details
Spot UV applies a clear, glossy UV-cured varnish only to selected design areas, rather than coating the entire box. It is most impactful over a matte laminated base, where the gloss/matte contrast shifts and catches light as the box moves.Image suggestion: Glossy spot UV botanical pattern over a matte cream folding carton, soft side lighting emphasizing contrast.
What Is Standard Spot UV?
Standard spot UV lays down a smooth, flat glossy clear coat over targeted print areas.Common applications:
- Brand logos and wordmarks
- Decorative illustrations and patterns
- Product names and callout text
- Graphic features you want to visually separate from the rest of the design
For example: a matte-laminated box with a subtle glossy logo stays calm and neutral head-on, then reveals the logo dynamically as light hits it from different angles.
What Is Raised Spot UV?
Raised spot UV uses multiple stacked layers of UV varnish to build gentle height, adding a tactile bump alongside the glossy sheen. It is popular for premium retail packaging, cosmetic boxes, promotional limited runs, and presentation kits where you want select details to stand out visually and physically.
Spot UV vs. Raised Spot UV
Feature | Standard Spot UV | Raised Spot UV |
Surface | Smooth, flat glossy | Glossy + slightly raised texture |
Visual effect | Light contrast and shine | Contrast, shine, and subtle tactile relief |
Typical use | Logo highlights, graphic accents | Statement logos, prominent decorative artwork |
Cost considerations | Based on coverage area + screen/plate setup | Extra material and repeated curing cycles add cost |
Key production check | Artwork separation and precise registration | Varnish height, minimum detail size, substrate compatibility |
Neither option is universally better. Your choice comes down to the look and feel you want, your artwork, your base paper stock, and your production budget.
What Should You Check Before Production?
Spot UV and raised spot UV require separate spot-color artwork layers, supplied to your printer's specifications. The UV area must register perfectly with the underlying printed design. Tiny gaps, ultra-thin strokes, and overly intricate filigree patterns often need simplification to avoid messy bleed or blurred edges.
Practical tip: For budget-friendly premium styling, matte lamination + spot UV on your logo is a proven combo. It creates luxury contrast without layering multiple high-cost finishing processes.
- Lamination: Choose the Right Base Surface Finish
Lamination bonds a thin plastic film over your entire printed surface. It defines the base look and feel of your box while adding scratch, scuff, and moisture resistance. The three most common options are matte, gloss, and soft-touch lamination.Image suggestion: Three side-by-side cream packaging swatches showing matte, gloss, and soft-touch lamination for direct surface comparison.
Matte Lamination
Matte lamination delivers low-gloss, muted, understated surface with minimal reflection. It is the foundation for modern, minimalist premium packaging, pairing beautifully with dark forest green, black, warm cream, and muted earth-tone brand palettes.Important caveat: Not all matte films resist fingerprints equally well. "Matte" does not automatically mean fingerprint-proof. Ask your supplier for film specs or samples if hand contact will be frequent.
Gloss Lamination
Gloss lamination creates a bright, reflective surface that makes printed colors appear saturated and vivid. It is ideal for vibrant retail packaging, promotional seasonal boxes, and designs that need to pop on crowded store shelves. Protective performance varies heavily by film grade.
Soft-Touch Lamination
Soft-touch lamination yields an ultra-smooth, velvety, rubbery handfeel — one of the most recognizable luxury packaging finishes. It is widely used for high-end cosmetics, fragrance boxes, luxury gift sets, and investor presentation packaging.While it feels sophisticated out of the box, soft-touch films differ greatly in scratch and scuff resistance. If your boxes will be handled repeatedly, shipped, or stacked, always test a physical sample before committing.
Lamination Selection Table
Lamination Type | Appearance | Common Applications | Key Consideration |
Matte | Low-gloss, subdued | Minimalist, modern premium packaging | Fingerprint and scuff resistance vary by film |
Gloss | Highly reflective, color-boosting | Colorful retail, promotional packaging | Surface durability and glare depend on film selection |
Soft-touch | Velvety, smooth tactile feel | Luxury gift, beauty, presentation boxes | Verify scratch resistance for high-handling use cases |
Practical tip: Pick lamination first based on your brand's core aesthetic and real-world handling conditions. If durability matters more than aesthetics, test physical samples rather than relying solely on finish names.
- Packaging Finishes Comparison: Which Option Is Right for You?
Each finish solves a different design goal. This table is a buyer-focused quick reference for comparing finishing options for custom packaging:
Finish | Main Effect | Common Applications | Cost Considerations |
Foil stamping | Metallic reflective shine | Logos, premium graphic accents | Foil coverage, die tooling, setup fees, order quantity |
Embossing | Raised tactile texture | Logos, decorative patterns | Custom die cost, paper stability, artwork complexity |
Debossing | Recessed, subtle texture | Quiet minimalist branding | Die cost, material thickness, impression depth |
Spot UV | Selective targeted gloss | Logo highlights, graphic callouts | Coated area, artwork separation, screen setup |
Raised spot UV | Raised glossy texture | Statement premium highlights | Multiple varnish passes, curing and registration limits |
Matte lamination | Low-gloss uniform surface | Modern minimalist packaging | Film grade, surface treatment, anti-fingerprint performance |
Gloss lamination | Bright reflective surface | Vibrant retail packaging | Film thickness, UV stability, scratch resistance |
Soft-touch lamination | Velvety smooth handfeel | Luxury gift and beauty packaging | Premium film pricing, scuff and fingerprint performance |
This is a general overview, not a fixed price ranking. Final pricing shifts dramatically with box structure, board grade, run quantity, finish coverage, and your supplier's workflow.When reviewing quotations, explicitly confirm which finishing steps are included in the unit price, and whether tooling, dies, screens or setup charges are billed separately.
- How to Combine Packaging Finishes Without Overspending
The most memorable packaging designs usually rely on one primary base finish plus one or two carefully chosen accent effects. Piling on every available finish inflates cost, complicates registration and production sequencing, and can create visual clutter that dilutes your brand identity.Here are three balanced, widely effective finish combinations to consider:
Option 1: Luxury Packaging
Soft-touch lamination + foil stamping + embossingThis stack delivers a velvety base surface, metallic highlights, and satisfying raised logo texture. It works beautifully for fragrance, high-end skincare, and luxury gift boxes.Note: Multiple sequential processes raise production risk, registration tolerance requirements, and total cost. Always validate with a physical sample.
Option 2: Clean and Modern Packaging
Matte lamination + spot UVA calm matte foundation lets selective glossy UV details create quiet, dynamic contrast. This is a versatile, cost-effective choice for skincare packaging, contemporary DTC retail brands, and minimalist brand identities.
Option 3: Restrained Premium Packaging
Matte lamination + selective foil stampingUse lamination as your base, and reserve foil only for your logo or one key graphic element. It achieves refined luxury without the complexity of multi-process finishing.
What Should You Avoid When Combining Finishes?
Before locking in mixed finishing specs, work through these checks:
- Do not add a finish unless it actively improves the unboxing experience or reinforces your brand.
- Verify compatibility between finishes and your chosen paper/board stock. Some finishes repel or react with one another.
- Confirm the correct production sequence with your supplier. Order of operations directly impacts quality.
- Map finishes against crease lines, folds, glue flaps and box edges. Foil and UV across folds often crack.
- Evaluate whether one-off tooling charges make sense for smaller order volumes.
When combining multiple finishes, a physical pre-production sample is non-negotiable. It lets you inspect surface quality, alignment, tactile depth, and fold behavior before mass production.
Real-World Example: Avoiding Foil Failure on Fold Lines
On one custom packaging project, the customer wanted interior gold foil, but our team flagged a high risk of foil cracking and flaking along folded creases. Foil's durability depends heavily on substrate flexibility and placement relative to score lines.We presented an alternative: gold pigment printing paired with spot UV. This delivers a warm gold aesthetic while eliminating the cracking risk on folding areas.There is no universal "best" solution. The right finish depends on your artwork, paper, box structure, and desired look. Samples are especially critical whenever a finish crosses a crease or sits near folded edges.
Key takeaway: Premium finishes should work with your box structure, not against it. Before approving specs, evaluate both visual appeal and how the box will fold, assemble, ship, and be handled by customers.
- How to Choose the Right Finish for Your Custom Packaging Box
Your perfect finish selection starts with your product, brand personality, material constraints, and budget. Run through this checklist before finalizing packaging specifications:
1. Start with your brand identity Decide the feeling you want to communicate: luxurious, minimalist, playful, bold, or understated.
- Luxury brands: Foil, embossing, soft-touch lamination are strong candidates.
- Minimalist brands: Matte lamination paired with selective spot UV.
- Bright retail brands: Gloss lamination with targeted foil or UV highlights.
These are guidelines, not rigid rules. Your artwork and target audience always take priority.
2. Pick your primary visual or tactile effect first Identify the single most important outcome. If your logo needs to grab attention, foil or spot UV may be enough. If a memorable touch experience is your priority, embossing, debossing or soft-touch lamination may be the better fit. Avoid paying for competing effects that do not serve your core goal.
3. Account for your packaging material Not every finish works reliably on every substrate. Paper grain, surface coating, board thickness, and folding geometry all change results. Confirm material-finish compatibility with your supplier before finalizing files.
4. Review your artwork and dieline together Finishing layers must align with your print file and structural dieline. Foil and spot UV need separate spot-color separations; emboss/deboss requires dedicated die artwork. Your supplier will specify file formats, spot-color naming, registration tolerances, and bleed rules.For more guidance, read our article: 7 Things to Check on a Packaging Dieline Before Production
5. Request a physical sample Digital mockups are great for layout review, but they cannot replicate metallic reflection, tactile depth, surface slip, fingerprinting, or fold performance. Always sample when finishes are central to your brand experience or when combining multiple processes.
6. Evaluate total packaging cost, not just finish cost Do not judge finishing upgrades in isolation. Price out the full package: box structure, board stock, printing, finishes, inserts, and packing requirements.If you want to cut cost while preserving quality, explore our cost-reduction guide: 7 Ways to Reduce Custom Packaging Costs Without Sacrificing Quality For broader budgeting guidance: How Much Do Custom Packaging Boxes Cost? Pricing Guide
Frequently Asked Questions About Packaging Finishes
What are the most common packaging finishes?
The most widely used custom packaging finishes are foil stamping, embossing, debossing, spot UV, raised spot UV, plus matte, gloss and soft-touch lamination. Each modifies surface appearance, texture, or protective properties in distinct ways.
Which packaging finish looks the most premium?
There is no single "most premium" finish for every brand. Foil delivers metallic shine, embossing adds tactile depth, and soft-touch lamination creates a luxe velvety surface. Usually the most balanced high-end look comes from a solid base lamination plus one carefully chosen accent finish, rather than stacking every effect.
Does foil stamping increase packaging costs?
Yes. Foil stamping adds a dedicated production pass. Cost is driven by coverage area, foil type, custom die setup, artwork complexity, and order size. Always lock in final pricing with your supplier before approving specs.
Can foil stamping and embossing be combined?
Yes. Registered foil + embossing pairs metallic foil with a raised relief effect. Material, die design, artwork, and production sequence all need to be compatible. A physical sample is the best way to confirm quality and alignment.
Is spot UV expensive?
Spot UV pricing depends on coverage area, artwork complexity, screen setup, and quantity. A simple logo highlight can be a budget-friendly premium upgrade, while raised spot UV or dense, intricate patterns carry extra processing expense.
What is the difference between matte and soft-touch lamination?
Matte lamination creates a low-reflection, non-glossy surface. Soft-touch lamination has a special additive that creates a velvety, rubbery handfeel. Both are used for premium packaging, but they differ dramatically in touch, fingerprint resistance, and scratch performance by film grade.
Do packaging finishes increase production time?
They often do. Each extra finishing step adds setup, run time, and quality inspection. If your design includes foil, emboss, spot UV or specialty lamination, confirm lead time upfront before locking in your launch timeline.
Should I request a sample before mass production?
Absolutely — especially when you use specialty finishes or combine multiple finishing techniques. A physical sample lets you assess true surface texture, light behavior, registration accuracy, fingerprint susceptibility, and folding performance before approving full production.
Looking for Packaging Finishing Guidance?
Choosing packaging finishes is about far more than aesthetics. The right combination must reinforce your brand identity, work harmoniously with your box structure, and fit within your budget.Cherubox supports DTC brands, product creators, and wholesale buyers with end-to-end custom paper packaging solutions, including box structure development, material selection, printing, and finishing options such as foil stamping, embossing, spot UV, and lamination.Share your artwork, preferred box style, order quantity, and target finishing effects. Our team can walk through compatible options and flag production risks before you send files to press.
Can foil stamping and embossing be combined?
Yes. Registered foil + embossing pairs metallic foil with a raised relief effect. Material, die
design, artwork, and production sequence all need to be compatible. A physical sample is the best
way to confirm quality and alignment.
Is spot UV expensive?
Spot UV pricing depends on coverage area, artwork complexity, screen setup, and quantity. A
simple logo highlight can be a budget-friendly premium upgrade, while raised spot UV or dense,
intricate patterns carry extra processing expense.
What is the difference between matte and soft-touch lamination?
Matte lamination creates a low-reflection, non-glossy surface. Soft-touch lamination has a special
additive that creates a velvety, rubbery handfeel. Both are used for premium packaging, but they
differ dramatically in touch, fingerprint resistance, and scratch performance by film grade.
Do packaging finishes increase production time?
They often do. Each extra finishing step adds setup, run time, and quality inspection. If your
design includes foil, emboss, spot UV or specialty lamination, confirm lead time upfront before
locking in your launch timeline.
Should I request a sample before mass production?
Absolutely - especially when you use specialty finishes or combine multiple finishing techniques.
A physical sample lets you assess true surface texture, light behavior, registration accuracy,
fingerprint susceptibility, and folding performance before approving full productio
Looking for Packaging Finishing Guidance?
Choosing packaging finishes is about far more than aesthetics. The right combination must
reinforce your brand identity, work harmoniously with your box structure, and fit within your
budget.
Cherubox supports DTC brands, product creators, and wholesale buyers with end-to-end custom
paper packaging solutions, including box structure development, material selection, printing, and
finishing options such as foil stamping, embossing, spot UV, and lamination.
Share your artwork, preferred box style, order quantity, and target finishing effects. Our team can
walk through compatible options and flag production risks before you send files to press.Request a quote: https://www.cherubox.com/contact-us
Email: sales@cherubox.c